SEARCH
Enter keywords, product name, or question
How to rotate the blades on my Ryobi Planer?
If you see that your blades are damaged/chipped or dull you can rotate them once.
Safety First
- Always remove battery before making adjustments to the planer
Appropriate PPE
- Gloves
- Locate wrench
- Above the battery port, located on the planer, is an included wrench.
- Simply pull out the wrench.
- Loosening the blade bolts
- Rotate the planer so you are looking at the base
- Next to the blade is a wheel that rotates the blade without having to touch it.
- Rotate the blade assembly so that the damaged/worn blade is facing outwards.
- While holding the wheel still, using the included wrench turn each of the 3 blade bolts Clockwise to loosen them.
- Loosen the bolts until the blade assembly is loose.
- Removing and flipping blade
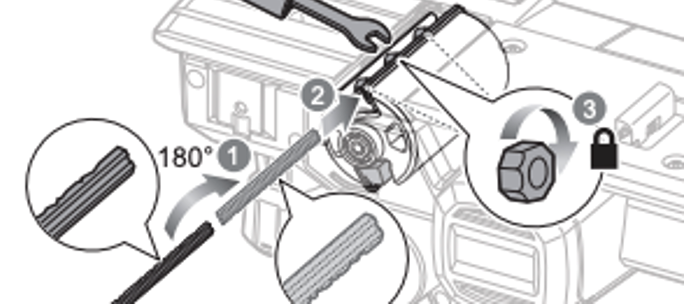
- Still holding the wheel, push (slide out) the damaged/worn blade away from you
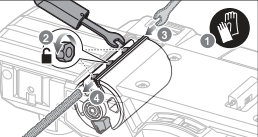
- Once the blade is removed, flip the blade over to the sharp side. ( If both sides are damaged, then a new blade will need to be purchased)
- Push the blade back into the blade assembly, sliding it in from the side. (The V-groove faces away from the bolts) There are very small bumps that help align the blade as you slide it back in.
- Still holding the wheel, push (slide out) the damaged/worn blade away from you
- Tightening the blade bolts
- When the blade is fully inserted, before tightening the bolts, ensure the blade is central to the blade assembly.
- Then ensure the assembly is central to the Planer base
- Tighten the bolts gradually turning them in an Anti-clockwise direction.
Ensure to tighten the bolts evenly.
RPL18